Multisites are an efficient way to create and manage multiple websites with a single WordPress installation. In this article, you'll learn what the WordPress multisite feature is, its pros and cons, and how to set it up.
What are WordPress multisites?
WordPress Multisite is a feature of WordPress that allows you to create and maintain multiple websites from a single WordPress installation. All sites use the same WordPress installation and an advanced permission hierarchy to allow users access to specific pages and features. Multisite is supported natively by WordPress, but must be set up beforehand.
Advantages and disadvantages of WordPress multisites
Advantages:
- Save resources and time: No need to set up and maintain separate WordPress installations for each website.
- Consistent design and easier branding: Centrally defined themes and plugins can be used.
- User management: Users can be centrally managed and shared between sites.
- Easier updates: Updates only need to be applied to the main installation.
Disadvantages:
- Limited customization
- One failure can affect all sites
- Less flexibility with plugins and themes
- Higher technical effort to set up
How does the user management work with a multisite?
By installing a WordPress multisite, you position yourself as a network administrator with administrative rights over every website on the network. For example, you can allow other users to create their own sites.
The access rights of a site administrator are limited compared to those of a network administrator. As a network administrator, you can install themes and plugins, whereas site administrators can only enable them, but not install new ones. This rule contributes to the security of your network.
Another right of site administrators is to add new users. However, newly added users only have access to the sites they are added to, not the entire network. User information is stored once for the whole network. This makes it possible to give existing users access to additional websites without having to create new user accounts.
What distinguishes a multisite from a single site?
In addition to changes to the permissions system, Multisite adds a new layer to the user interface: network management has its own administrative dashboard.
The way Multisite handles media and data is also different. Multisite provides additional upload folders for each site on the network. Multisite also creates additional database tables for each site to store data.
What domain structures are possible with multisites?
If you want to use WordPress Multisite for your website, the domain structure is particularly important. Note that once a multisite is set up, the domain structure should not be changed. So think carefully about what is best for your particular project. Although it is technically possible to make changes, they are often complex and can lead to errors that are difficult to correct.
There are two main options you can use for your multisite installation:
- Subdomains
When using subdomains, each subsite is set up as a subdomain of the main domain. In this case, the URL of a subsite would look like this Subsite1.yourdomain.com.
This option can be useful if you want each subsite to be perceived as a separate entity that is connected to the main site, but still has some independence.
- Directory structure
If you choose the directory structure, each subsite of your multi-site installation will be created in a separate directory under the main domain. For example, the URL of a subsite would be www.yourdomain.com/Subsite1.
This option is particularly useful if you want to maintain a single domain and view the subsites as part of a larger whole.
WordPress Multisite Setup
Prerequisites::
- An existing or new installation of WordPress
- Access to your web server's wp-config.php file and .htaccess file
- (optional) access to your host's domain and subdomain settings
- (Recommended) Backup of your WordPress installation
Steps to set up:
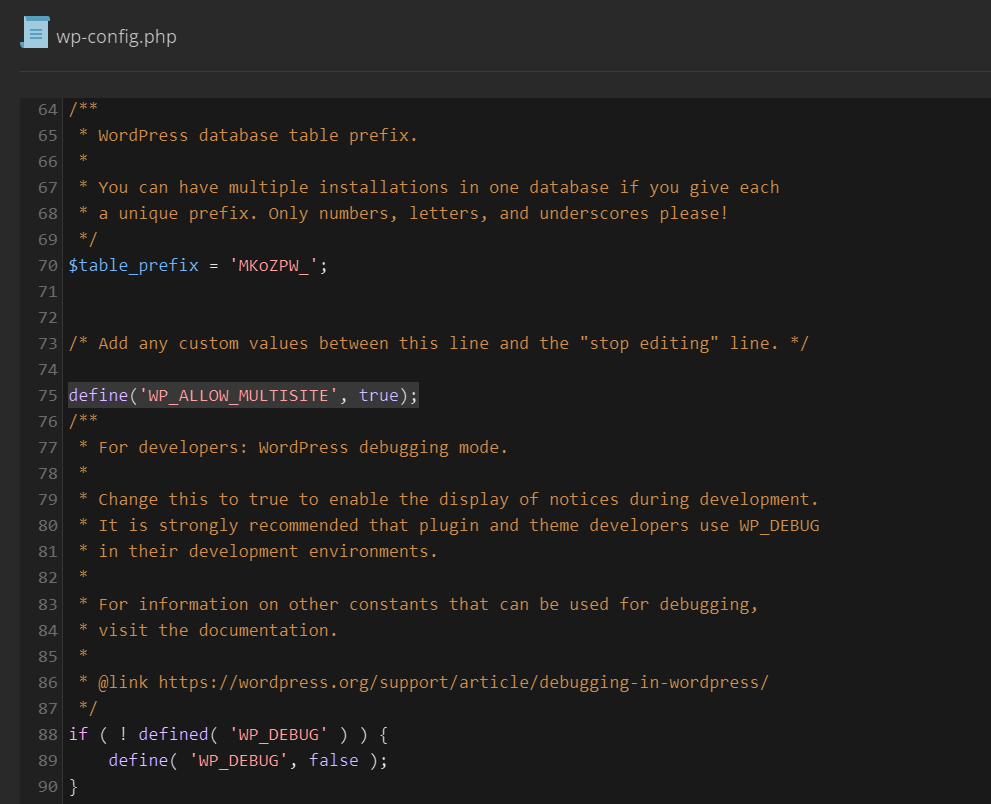
Step 1: Make sure that the multisite feature is enabled in the wp-config.php file. Look for the following line or add it if it is missing:
define('WP_ALLOW_MULTISITE', true);

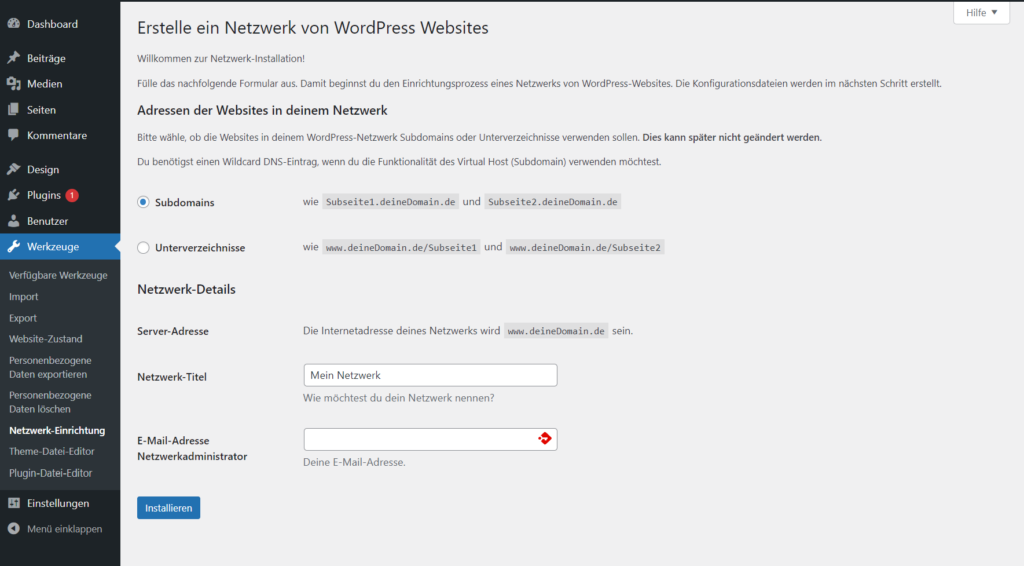
Step 2: Login to the WordPress backend and select "Tools" --> "Network Installation".
Step 3: Follow the setup wizard. You will be asked to select your subdomain or subdirectory structure and enter your network details.

Note: If you decide to use the subdomain structure, your domain will need a wildcard DNS record so that WordPress can create the subpages. This needs to be set in your domain's DNS. If you do not have access to the DNS or are unsure about the configuration, contact your host.
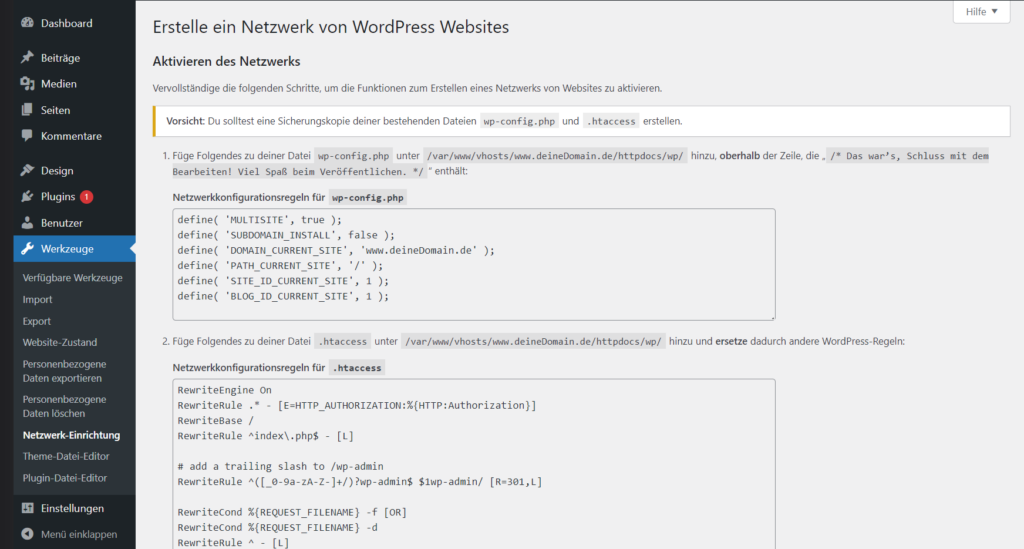
Step 4: Add the code snippets provided by WordPress (see screenshot below) to the appropriate files (wp-config.php and .htaccess).

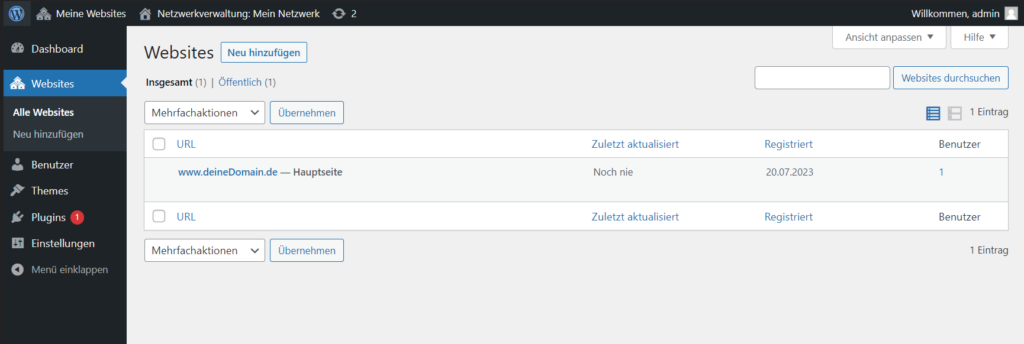
Step 5: Log back into the WordPress backend and start managing your multisite installation.

