After a lengthy and troubled journey, it is finally here: Gutenberg - The new editor of WordPress 5.0, a replacement for the previous Tiny-MCE editor.
In this article, you will get 12 helpful tips that will increase your productivity with the new Gutenberg enormously.
1. Gutenberg Basics
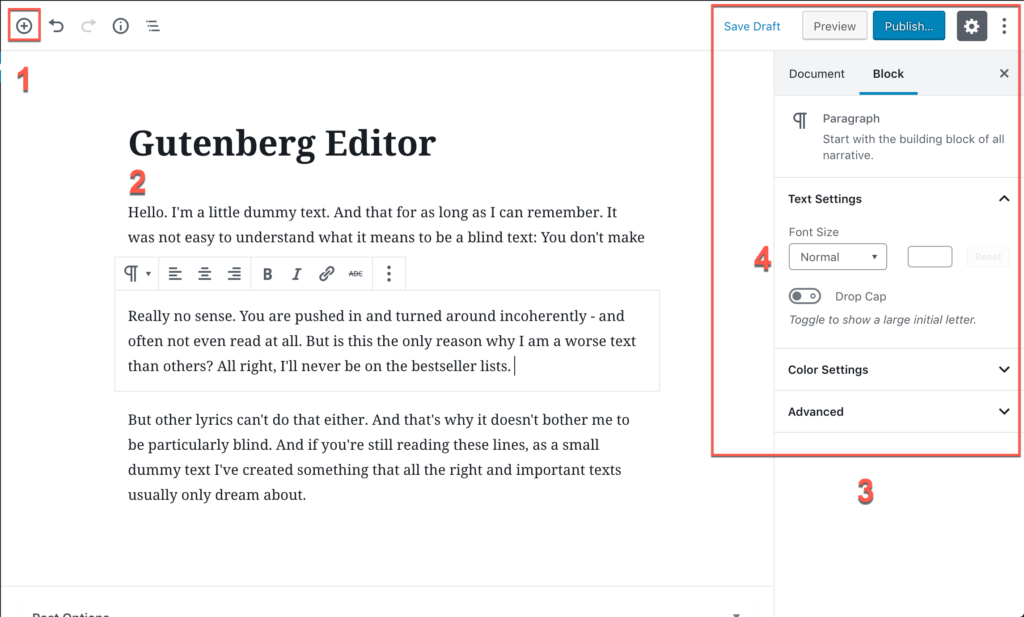
To get started, you must first find out where your tools are in the Gutenberg Editor. For your convenience, I have created the following graphic.

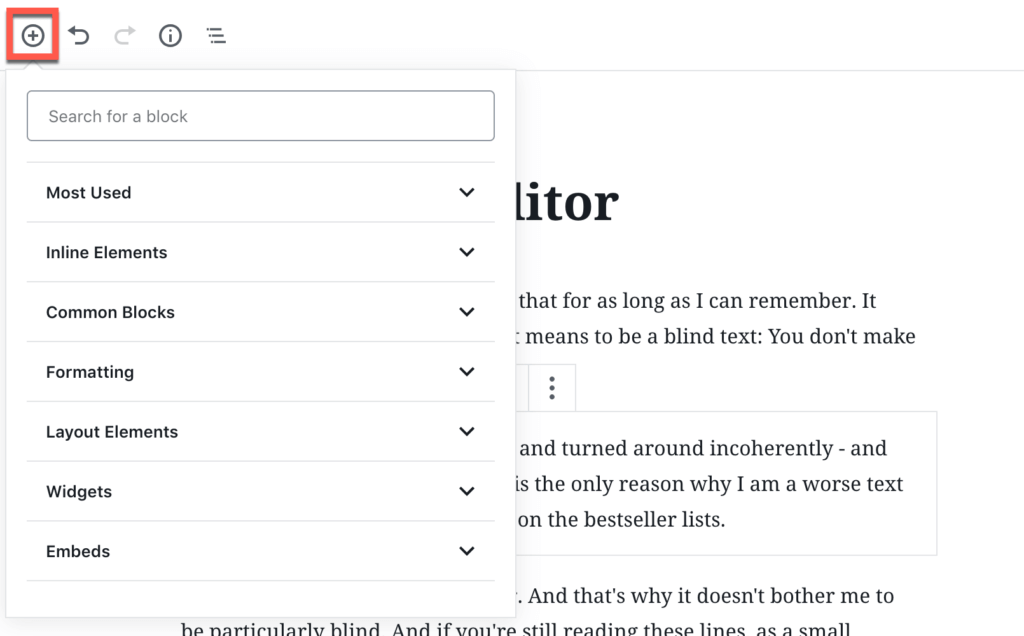
- You need this button to add new blocks in Gutenberg. At the same time, you can see all available blocks at a glance. But there is an even faster way to insert blocks.
- This is the main area of the editor. At the top, you will find the title of the page or article and below that the content.
- As you can see, you can perform many of the same actions here as in the main area. There is only one important difference: If you select a block here, the system changes directly and you can start editing immediately.
Let us come to the illustration of point 3.
If you click on one of the paragraph blocks, the system switches to the Block tab and you get the functions for changing colors, text size (point 4), dropdown menu, etc. If you want to return to a different setting, you can simply click your way out of the block or select the Document tab.
2. The advantages of content blocks and how you can use them
The new content blocks and choices are one of the great advantages of Gutenberg. Those would have never been possible before with the native TinyMCE editor.

It is highly recommended to search for the complete block list. Here are some of the cool new things you can add now:
- Buttons
- File downloads
- Cover images
- and much more
It may well be that some of your favorite plugins have also created their own blocks. So it's worth looking into it.
For example, if you have a gallery plugin, it might well be that it also has a special gallery block for you.
3. Use your blocks with the slash "/" quickly
Let's go a little deeper now. The +symbols are good for browsing the available blocks but slow down the way to add new blocks. To bypass all the mouse clicks that would be required for an entire post, just type "/" and you will get a new block and name it.
As you type, Gutenberg will automatically suggest blocks that you might want to consider. "Enter" allows you to enter the suggestion to insert the block immediately:
4. Discover the Gutenberg Editor Shortcuts
What's nicer than shortcuts? Anyone who likes to work productively will surely agree with me.
Most general key combinations also work in Gutenberg. In addition, Gutenberg also offers a special swing of special shortcuts that you can use to save time.
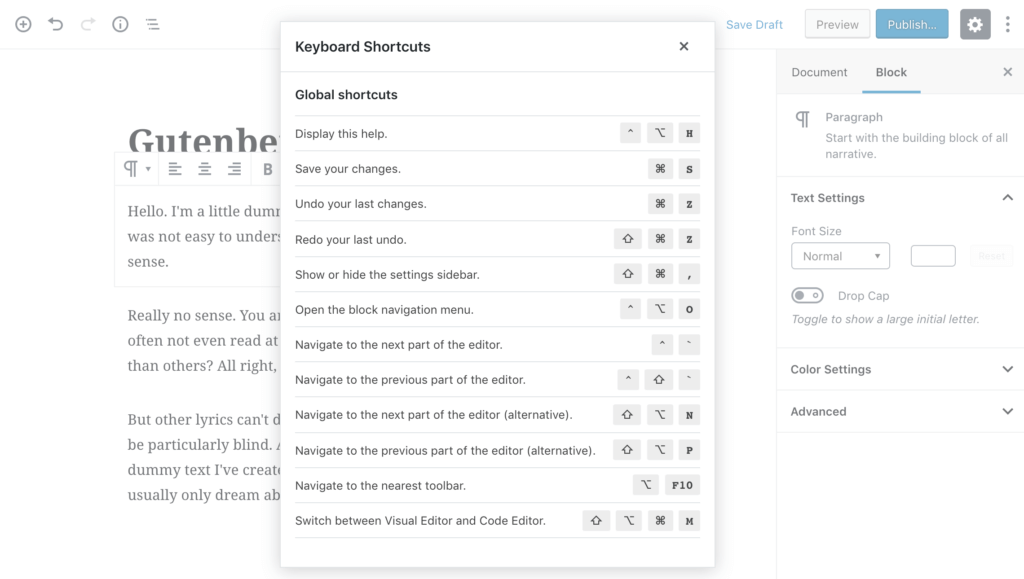
Use the key combination Shift + Alt + H (Windows) / Ctrl + Alt + H (Mac) to display a complete list:

Even though I recommend searching the complete list, I will show you my Top Gutenberg Shortcuts:
Ctrl + Alt + Backspace - Delete the selected block (Super helpful, otherwise you would have to click multiple times to delete a block).
Ctrl + Alt + T - A new block is inserted before the selected block.
Ctrl + Alt + Y - A new block is inserted after the selected block.
Ctrl + A + A - The entire content is highlighted.
Besides the shortcuts, you can also use a markdown syntax. The following is a list of some of the Markdown syntax inputs that work in Gutenberg:
- ## Create heading
- an ordered list create.
- * Create an unordered list.
- > create a quote
For example, if you want to create an H2, type "##" and then press the space bar. Now Gutenberg automatically creates the heading block.
Here is an example:
5. Transform blocks into different blocks
To save time, you can also subsequently convert a block to another block type instead of inserting a block for each content type.
This function is especially useful for texts. For example, you could convert regular paragraph blocks into the following block types:
- Headings
- Quotes
- Lists
- Pre-formatted verse
Other block types can also be converted, e.g. the conversion of a title image into a normal image.
To access the conversion options, use the toolbar:
6. Add a fixed toolbar for easier formatting
Some people don't appreciate how the Gutenberg toolbar fades in and out when you switch between blocks.
If you also don't like it, you can activate a fixed toolbar in Gutenberg, which can be used at any time at the top of the Editor.
You can activate this mode by clicking on the three points in the upper right corner and selecting Upper Toolbar.

7. Use drag-and-drop to rearrange your blocks
We all still know the "cut and paste" function to rearrange our content. This function is still available. A more convenient way, however, is to use Gutenberg's integrated drag-and-drop layout controls.
In order to move your blocks to a new position using the Drang-and-Drop function, you must first activate this mode. Move your mouse over the block and then over the six-point symbol on the left.
You can also use the up and down arrow keys to move blocks in that direction.
Now just click and drag:
8. Use Shift+Enter for line breaks without using a new block
Do you want to start a new text line without using a new paragraph block? Nothing easier than that. Simply use Shift+Enter instead of the usual Input:
9. Create columns with the Columns block
In addition to the new content blocks, Gutenberg also offers you the opportunity to become more creative within the Columns.
Once you have added a column, you can add more blocks within it. It is also possible to nest the columns further to create more distance.
Here the following layout example "25% - 25% - 50%":
To create this, I simply added another block inside the left column of the existing Columns block.
10. Save time by creating reusable block templates
Here, too, we have received a very cool Gutenberg function to save time.
Once you have created a specific block configuration that you will need to reuse in the future, Gutenberg allows you to save any set of assembled blocks as a reusable block template.
This will save you a lot of time because you won't have to reassemble everything every time.
To do this, first select all the blocks concerned by simply clicking and dragging as before.
Now click on the three-point symbol. (If you are using the Unified Toolbar, this icon will be displayed at the top of the toolbar instead. is displayed.) Now select "Add to reusable blocks" from the drop-down list:
Now you have created your block template and can give it a name.
From now on you can simply insert this entire block template, as with any other Gutenberg block.
It's also great that you can import/export block templates as JSON files to use on other pages.
Click on the three-point symbol in the upper right corner to access your blocks.
This will take you to an area where you can do the following:
- Importing Block Templates from a JSON File
- Delete block templates
- Exporting Block Templates as JSON Files
11. Edit your slug (hard to find)
Since the Gutenberg sidebar is very similar to the WordPress editor, backend contribution editing is quite simple.
What doesn't work intuitively, however, is the choice of the URL plug for your post. This is actually not easy to find, so here is my tip:
As shown in the following example, you first click on the title to edit the URL Slug in Gutenberg. Here you can find and edit it:

12. Switch to Code Editor (HTML)
With the current TinyMCE editor, you're probably used to jumping to the Text tab for direct HTML editing.
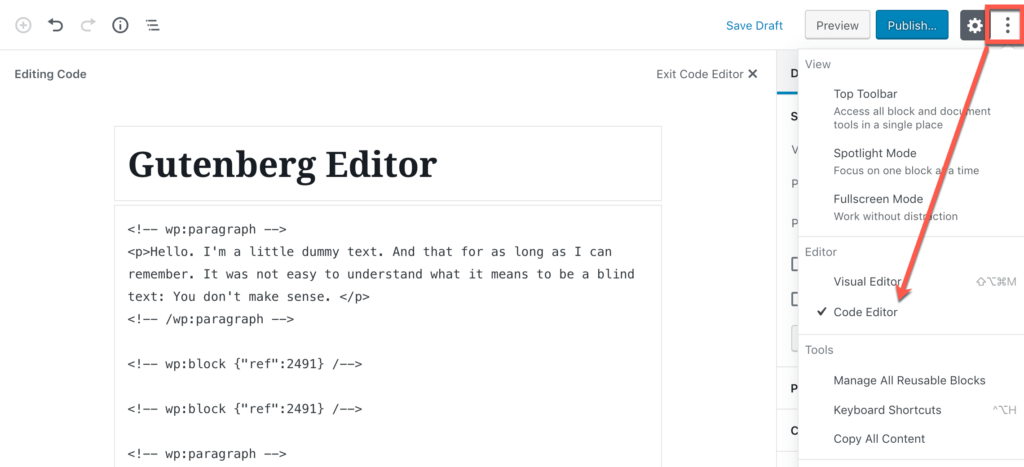
Gutenberg still lets you do that, you just have to click your way through the block tags.
To call up the HTML editor, you can either use the three-point symbol in the upper right corner or the key combination Ctrl + Shift + Alt + M. The HTML editor can also be called up using the following keys

